The ieeg.properties File
Shared with the CNT
This procedure runs on infrastructure the lab and the CNT operate together. The CNT manual keeps its own copy; changes to the shared steps are agreed with the CNT.
What this page tells you
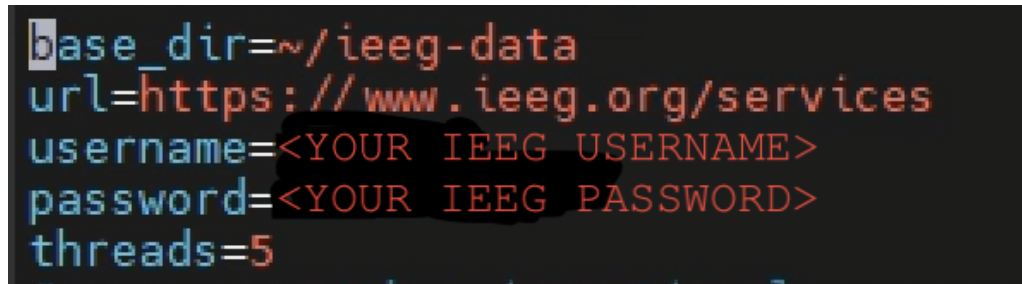
Create an ieeg.properties file in your cnt1 home directory (ssh cnt1, touch ieeg.properties) with base_dir, url, username, password, and threads=5, so you can upload to ieeg.org. Test with ./ieeg size 'Study 005' in ieeg-latest; expect 3.438GB.
How to Create an ieeg.properties File
This file is necessary in order to be able to upload to ieeg.org
Each person who uploads to ieeg.org creates this file once, in their own cnt1 home directory, before their first upload.
Helpful link:
- Go to your home directory with these commands:
- In MobaXterm in the VDI, enter the cnt1 server with ssh cnt1.
- Then enter your home directory with
cd /home/<pennkey>.
- In your home directory (shown as ~), create a file called ieeg.properties with these commands:
- touch ieeg.properties
- cd /project/eeg_process
- cd programs
- cd ieeg
- cd ieeg-latest
-
Edit the properties file to look like the image below, replacing the <> sections with your information.
-
To save, if you are editing in vi: press the Escape key, then type :w.
- To quit vi: press the Escape key, then type :x.
- When you upload to ieeg.org for the first time, an ieeg-data folder is created in your ~ directory. This shows that everything is working for your account.
TO TEST THE INSTALLATION:
- In ieeg-latest, run: ./ieeg size 'Study 005'
- If the file was created correctly, the output is 3.438GB.